It has been awhile since I’ve updated this blog. I have to admit life has once again taken over to a point where I’ve lost the love for simple pleasures like cooking and baking. I did at one stage consider shutting down this blog but this blog has been my pride and my baby for 2 years and to shut it felt like a waste. Yet maintaining it seemed more and more like a chore than a joy. Torn….that’s how I feel!

Today I was talking to Li San and she was asking advice about Malaysian dishes. I told her to come here and get the recipes she wanted and she said to me “It’s such a waste you aren’t maintaining it! All those nice food!” I thought about it and felt that in so many ways she’s right. Food – the soul to many lives and the thing that brings people together. I’ve realised in my hastiness to seek the material wealth of this world, I’d forgotten what it was like to run hot water over fresh herbs, to smell curry simmering away on the stove and to fill the house with the fragrance of apple pie coming from the oven. Perhaps it is time to return again…perhaps it’s time to say I will learn to have days off and enjoy what has always been my passion and love…perhaps it’s time….

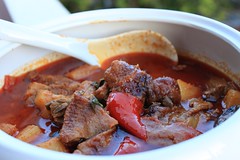
This dish here was a beautiful curry inspired by a recipe in Australian Gourmet Traveller. It was done a couple months ago on one of my cooking sprees, photos were posted on Flickr! but never made its way here till today. I hope you’ll enjoy it every bit we did 🙂 .
Red Curry of Duck & Pineapple
(Adapted and modified from Australian Gourmet Traveller November 2008)

Ingredients:
- 250ml coconut cream
- 60ml vegetable oil
- 200gm good quality red curry paste
- 2 dried limes (in replacement of 4 kaffir lime leaves)
- 60ml fish sauce
- 2tbsp brown sugar
- 500ml coconut milk
- 1 Chinese roast duck, boned and cut into chunks
- 3 long red chillies, halved lengthways, seeds removed
- 1/2 a pineapple, chopped into chunks
- Handful of Thai basil
- Lime, to squeeze
Method:
- Bring the coconut cream and vegetable oil to boil in a pan over high heat. Stir constantly to prevent from burning.
- When the coconut cream ‘splits’ (the oil separates from the solids), add the curry paste.
- Crush the dried limes in your hand and add to the pan, frying till aromas rise from the pan and it is sizzling fiercely. This will take approximately 10-15 minutes.
- Add the fish sauce and cook for approximately 1 minute. Then add sugar and remaining coconut milk. Bring to the boil.
- Add duck and chillies and simmer gently over low-medium heat. Then add in pineapple.
- Stir in basil and squeeze with lime juice just before serving.